Sunday, October 15, 2023

Apple Walnut Loaf

I was looking for a recipe that could use up some Granny Smith apples that were not fresh enough to eat as is but were looking to be cooked.  I stumble upon a great recipe by Inspired Taste and have tweaked it to my taste and how we cook things at home.  I've made this a few times and it always turns out great.  Delicious on it's own, it is also amazing with a slather of butter!

Ingredients:

4 Granny Smith apples, peeled (about 450 grams)

25 grams granulated sugar

100 grams brown sugar

1/4 teaspoon fine sea salt

1 1/4 teaspoons ground cinnamon

1/4 teaspoon ground ginger

1/4 teaspoon freshly grated nutmeg

190 grams plain flour - I use a freshly milled wheat flour

1 teaspoon baking powder

1/2 teaspoon baking soda

1/4 cup neutral oil like vegetable oil or grape seed oil

2 large eggs, lightly beaten

1 teaspoon pure vanilla extract

3/4 cup of roughly chopped Walnuts

How to:

  • PREPARE BATTER
  • 1Center a rack in the oven and heat to 170 celsius.  Line a  8 1/2-inch-by-4 1/2-inch loaf pan with parchment paper 

    2Peel and core the apples then use a box grater and shred them. Add the shredded apples to a large bowl.

    3Add the granulated sugar, brown sugar, salt, cinnamon, ginger, and nutmeg to the apples and mix well. Set the bowl aside for 10 to 15 minutes. As they sit, the apples will release quite a bit of liquid.

    4While the apples sit with the sugar and spices, prepare the dry ingredients. In a medium bowl, whisk or sift the flour, baking powder and baking soda together.

    5When the apples are ready, stir in the oil, beaten eggs, vanilla, until well blended.

    6Use a large rubber spatula to scrape the sides and bottom of the bowl then add the dry ingredients in three parts, stirring gently until they disappear and the batter is smooth. Stir in nuts.

  • TO FINISH
  • 1Pour batter into the pan and smooth the top. Bake 55 to 65 minutes, or until a knife inserted into the center of the bread comes out clean.

    2After 30 minutes in the oven, check the bread for color. If it looks like it is browning too quickly, loosely cover with aluminum foil.

    3When the bread is done, transfer it, in the pan, to a wire rack to cool for 5 minutes. Unmold the bread and place right side up on the rack. Cool completely before slicing.


Berry Choc Mega Muffins

I do love a big muffin!  It feels cafe like and really, living in a 2 person household, having 6 muffins to eat seems better than 12.

I have made this recipe with frozen mixed berries as well which is also amazing, just make sure that your berries haven't been sitting around in the freezer and are all icy as the water content will be too much. 


Ingredients

  • 260 g self-raising flour
  • 110 g caster sugar
  • 1 egg
  • 50 g vegetable oil
  • 1 tsp vanilla extract
  • 230 ml milk
  • 250 g frozen raspberries
  • 90 g white chocolate baking chips

How to:
  • Pre-heat oven to 180ÂșC and line  a large 6-muffin tray with individual pieces of baking paper.  I like the ready to go version you can get from the supermarket.
  • Sift the flour into a large mixing bowl and stir in the sugar. Form a well in the centre.
  • Lightly whisk the egg, oil, vanilla and milk until combined. Pour the wet ingredients into the flour and sugar well and gently fold together with a metal spoon until just combined. Add the raspberries and white chocolate chips and gently fold to combine, being careful not to over-mix.
  • Spoon the mixture evenly into the muffin pan and bake in the oven for 35-40 minutes .
  • Allow to cool in the pan for 5 minutes before transferring to a wire rack to cool completely.

Sunday, July 18, 2021

Spiced Apple and Walnut Loaf


Hi there!  How are you going?  So we are in the middle of COVID lockdown number 5 here in Melbourne, Australia... yeah, I know... number 5!!!  Like everyone else, we have been in the need of some comfort food lately so yesterday I created this delicious Spiced Apple and Walnut Loaf.

Ok, so we had some granny smith apples that were looking a bit tired, you know, the kind you would cook with but not necessarily want to bite into.  That was the inspirational starting point for this loaf.  I knew it would be heavy with fruit so I thought a loaf was probably the best shape to bake it in so you could slice it thick and smother with butter... yum!

Ok, to the nitty gritty stuff...

INGREDIENTS:
  • about 3 medium granny smith apples, peeled, cored and chopped into smallish cubes
  • 2 cups of wholemeal self-raising flower
  • 3/4 cup of brown sugar
  • 1/4 cup of olive oil
  • 2 egg whites
  • 3/4 cup of roughly chopped walnuts - plus extra for top
  • 3/4 cup of butter milk (be warned you may need to add more if your batter still feels a little dry)
  • teaspoon of cinnamon
  • half teaspoon of nutmeg (with the spices, feel free to add more for your tasting)
  • teaspoon of vanilla extra - the one with the vanilla seeds is my preference.
  • tablespoon of raw sugar to top the loaf

HOW TO:
  • This is so simple, I seriously just dumped everything into a bowl and mixed it up by hand.  Be careful to not over mix, just combine. You want a firmish batter that isn't too wet just together - what you would expect a muffin batter to look like.
  • Usually I would mix the wet ingredients together first but I was kinda lazy for this one (disclaimer)
  • Put batter into a loaf pan that measures about 23cm x 13cm - I always use a baking paper to line my pan so there's no issues getting the cake out!
  • top with a scattering of walnuts and sprinkle with raw sugar for a streusel like topping
  • bake in oven at 180 degrees Celsius for about 55 minutes or until a skewer comes out clean.
  • cool in pan for about 5-10 minutes, then on a rack until cool.
  • slice and serve with butter.

And I'm back... and a truffle Mac n Cheese


Wowsers, I haven't added to this 'blog' for quite some time.  I do use it quite a bit for my own personal reference - particularly when I'm hunting for an old favourite recipe and need to remember if it's 1 cup or 1 and a half, you know, that kinda thing.

So much has happened since I last posted.  There's been this thing going on - COVID-19 which has meant that we've been inside our houses, cooking up a storm.  I know lots of people have been making sourdough bread (yeah, sorry - that wasn't me but my husband kept us carb loaded!) and I know that many of us have sought comfort in food.

As a 'hey I'm back to the blog' I thought I would share my all time favourite winter comfort meal - Miss Mardi's Mac n Cheese.  What makes this meal different from your usual mac n cheese?  The addition of leeks, vermouth, cauliflower and truffle butter... it's a bit lighter with the addition of the cauliflower but still hits the spot!

I always make this with the philosophy of "that looks about right and that's enough" so I don't really measure anything but here are my tips if you are keen to try at home.

  • I break down a head of cauliflower into small florets
  • Sweat down 1 brown onion and a sliced leek - finish off the cooking with a splash of good dry white vermouth - I use Martini brand extra dry
  • Cook about half a bag of spiral macaroni (about 250 to 300 grams).  I always cook mine in salted water for about half the time it says on the pack - so about 5 minutes
  • Make the white sauce - start of with a traditional roux (butter and flour, then add milk).  For this version I used truffle butter - totally decadent!  Also I use skim milk, I know, I know but it is what we have in the house and seriously I prefer the less creamy sauce, it kinda allows the flavours to do their thing
  • Flavours for the mac sauce - I add a combo of sweet Hungarian paprika, cayenne pepper, garlic powder, small amount of chili powder, mustard powder, white pepper and salt. This is all eyeballed but generally speaking, go light on the 'hot' flavours and heavy on the mustard.
  • Mix sauce with leek, onion, cauliflower etc - stir through with this your grated cheese mixture.  I use about a cup and a half of a premixed grated cheese combo of cheddar, Parmesan and mozzarella.
  • Pop in a container or two and top with some extra cheddar, sprinkle some panko breadcrumbs on top and add small little squares of truffle butter on top (maybe about 5 - don't go crazy!!)
  • Into the oven it goes at about 200 degrees celsius for approx 25 - 30 mins.  keep an eye on it for brownness.
Serve with some fresh parsley, hot sauce if that's your thing and additional truffle oil if you want that really earthiness.


Ps. that is me pointing at the specks of black truffle - delicious!!!

Saturday, January 20, 2018

Buckwheat Pancakes

Buckwheat pancakes


I do love pancakes, though they are something that I normally don't make at home as they don't seem very healthy and I feel like I'm chained to the stove making pancake after pancake.  It's so funny as I adored making pancakes as a child and some of my first cooking memories are making pancakes!

This recipe for buckwheat pancakes is amazing!  It's simple, they're fluffy and it makes 4 large pancakes or 5-6 small ones, enough for yourself and partner for a weekend breakfast.  Serve with good quality maple syrup and berries and they are delicious!


Ingredients
1 cup buckwheat flour
2 tablespoons brown sugar
1 teaspoon baking powder
1/2 teaspoon baking soda
pinch salt
1/8 teaspoon each of cinnamon, ground cloves, ground nutmeg
1 egg
1 cup buttermilk
1 tablespoon butter melted

***


How to!
  • mix flour, and dry ingredients together in a mixing bowl.  
  • whisk melted butter, buttermilk and egg and combine with dry ingredients.
  • cook 1/3 cup scoops (or your own preference) in a non stick frypan in a combo of a little olive oil and butter on a medium to medium high heat.
  • when you see bubbles coming up on pancake (after about 3 minutes), flip to other side.  This should only need another 1-2 minutes to cook.
  • if need be, keep cooked pancakes in a low oven to remain warm.


The great thing about these pancakes are they are gluten free, high in protein and a good source of fibre... really good for you all round!  Enjoy!


Tuesday, April 25, 2017

Banana Pecan Muffins

Banana muffins


The constant need to use up over ripe bananas led me to try this newish recipe.  Normally I do a banana, pecan and date loaf when needing to use up bananas but it takes quite a bit of time to bake so welcome the Banana Pecan Muffin!

You will need for muffin batter:
1 1/2 cup of wholemeal self raising flower
3 ripe bananas mashed
2/3 cup of coconut sugar
1 egg
1 teaspoon vanilla
1/2 cup melted butter

Topping:
1/3 cup brown sugar
2 tablespoons plain flour
2 tablespoons soft butter
2 tablespoons rolled oats
about 1/3 cup chopped pecans

How to!

  • preheat your oven to 180 degrees celsius and line a 12 x muffin pan with liners.
  • combine mashed banana, sugar, melted butter, egg and vanilla in a large bowl.
  • add flour and stir to just combine - they say you shouldn't over mix muffins.
  • divide batter over the 12 muffin cups.
  • in a small bowl, combine the topping ingredients, treat it like you would an apple crumble topping - rubbing the butter through the other ingredients.
  • sprinkle topping on top of muffin batter- slightly press into batter so you don't lose any nuts!
  • bake for about 18 minutes - until cooked!
Next time I would probably add a little nutmeg to the batter just to give a further depth of flavour and maybe even pop some finely chopped pecans in there as well - otherwise pretty delicious!

Sunday, May 17, 2015

Cornflake Cookies

Cornflake cookies


Occasionally I get a craving for a childhood favourite, Cornflake Cookies.  There is something about the plain cookie base, the sweet raisins and the crunchy cornflake outer that totally does it for me!  I made these cookies yesterday and they really haven't spent much time in their airtight container... they are too delicious!

I like mine a little thick, meaning they are a bit more cake like in the middle; soft and airy, a contrast to the crunchy outside.

This recipe makes about 12 cookies.

You will need:
125g softened butter
1/3 cup brown sugar
1 egg
1 teaspoon of vanilla extract
pinch of salt
1 cup self raising flour
1 cup of raisins
2 to 3 cups of cornflakes


How to!

  1. preheat oven at 180 degrees celsius
  2. cream butter and sugar together until pale and fluffy.  Add egg and vanilla and continue to beat
  3. Add flour and salt and mix to combine
  4. stir in raisins to combine
  5. using a tablespoon, add balls of cookie mixture to the cornflakes and roll to coat.  I press down slightly to flatten and ensure cornflakes are pressed in.
  6. bake for 15 to 20 minutes, cookies will spread slightly.
  7. cool on wire rack and store in airtight container.

Sunday, January 11, 2015

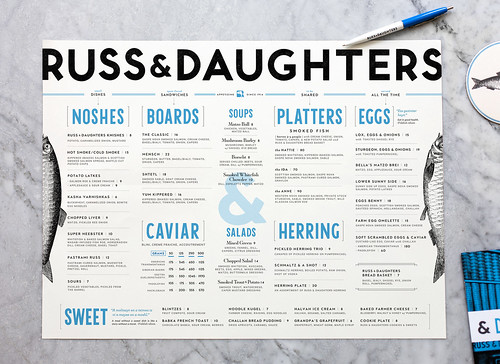
Russ & Daughters Cafe NYC...

Russ & Daughters


Even after waiting about an hour and a half for a table, we managed to indulge in a bunch of Russ and Daughter treats on a cold New York City afternoon.  The cafe (a new addition to the store in the lower east side) opened recently and we were pretty excited to try ALL that they had to offer.

Russ & Daughters


To start off with, we had some Bloody Mary's made with their own infused vodkas.  Mine was smoke infused and definitely had a killer savoury smoke addition.

Russ & Daughters


To start off with, we shared a serve of latkes with creme fraiche and salmon roe.  This is a marriage made in heaven, one of those dishes that you could eat every single day.  The potato latkes had spring onions inside for some extra flavour.

Russ & Daughters


I had the Pastrami Russ, a pastrami cured salmon (amazing!!) with sauerkraut and cheese on a pretzel roll.  Served with pickles and the house made waffle crisps.  I can't explain the perfection of this dish. And those waffle crisps, well, I could eat them every day.  I loved that this wasn't a huge serving, just enough of all the elements to make it satisfying without being overwhelming.

Russ & Daughters


Mark had the 'Classic Board', Russ & Daughters perfection smoked salmon with sides of creme fraiche, red onion, capers, tomatoes, dill and your choice of bread.  We went with toasted pumpernickel.  You can see in the background a shot of vodka and a glass of their house made celery soda.

Russ & Daughters


There is nothing better than good quality vodka, cured fish and good bread... look at my happy face!!!


Russ & Daughters


To finish off, this Halvah ice cream with salted caramel was amazing!!!  I've always eaten halvah with vanilla ice cream at home.  There is something about the taste and texture combination that is something simple, yet special.  Russ and Daughters take this to a whole other level in this dessert.  I also love that it is served in a metal bowl, meaning that the ice cream stays cold and slows the melting time.  I ate this pretty quickly though, I don't think melting was going to be an issue!


Russ & Daughters


And the classic egg cream... the drink that has neither egg or cream but is all taste.  Mark had been dying to try this classic and it didn't disappoint.  The addition of metal straws made us feel like we had stepped back in time.  This is what Russ and Daughters do, classic dishes, served simply and served well.  I mean, that is why they celebrated 100 years in 2014.  A true New York City institution that I don't think is going anywhere soon.

Wednesday, December 3, 2014

The Yellow Leaf Cupcake Co. Seattle

Oh yeah... Pancake and bacon cupcake... Drool...
Pancakes 'n' Bacon cupcake


While in Seattle we got our sugar fix at a gorgeous micro bakery Yellow Leaf Cupcake Co. located in Belltown, Seattle.  The staff and owners there were fabulous, friendly and gave us some samples to try as well!  (thanks guys!)

The Pancakes and Bacon cupcake is out of this world!  The frosting is super light and not overly sweet, it is an Italian style buttercream, which was more like a meringue.  Sooooo delicious!


And one of the best Red Velvet cupcakes I've had in the USA (and I've eaten quite a few!! Love this bakery!
Red Velvet Cupcake
My go-to cupcake is always a red velvet.  It is my way of telling how good the cupcakes are.  Kind of like when you go to a pizza store and get a margarita pizza... the plainer the better!  Anyway, this red velvet was amazing.  Moist and the cream cheese frosting was perfection!  If you are in the area, definitely check out Yellow Leaf Cupcake Co.  The only thing is it is very hard to leave with just one treat!

Tuesday, December 2, 2014

Coffee Nerds...

Getting our coffee fix #stumptown


Whenever we visit the USA, getting decent coffee is always a pretty big priority.  With all the walking that we do, we certainly need a good coffee hit!  While in San Francisco, we were glad to pick up these Stumptown cold brew serves at Whole Foods.  The coffee was sweet, without sugar and definitely not bitter.  A delicious way to get a coffee fix while walking those hills of San Francisco!

Stump town travel kit


I'm also a bit in love with this travel kit that Stumptown makes.  If anyone feels like buying it for me for Christmas, it would be most appreciated!!!

Saturday, June 21, 2014

Foods as big as my head...


I do love a good self-portrait with oversized or weird looking vegetables from our garden.  It's like I use the scale of my head to show everyone how big something is! Not that you really know how big my head is...

So I thought I would share some of my selfie gems...

Self portrait with fennel... This is some seriously large fennel from our veggie box!!


Selfie with a very large fennel....


Hello curly pepper!! Grown by @elgatogrande


with a curly long pepper...


The giant gherkin!!!


With what I thought was the largest gherkin ever!!!!


This beer is bigger than my head!

and it isn't just vegetables!  How about a beer that is as big as my head?


Mustard


Oh and of course, this mustard that is huge!!!

I truly can be quite the dork....

Wednesday, May 21, 2014

Macaron, Macaron, Macaron... in Hong Kong!!

Macaron madness!!


For some reason, I've been on a bit of a macaron addiction of lately.  There is a little French bakery near my work that fulfils my sweet needs during my lunch breaks.  I love some of the more unusual flavours that people are doing in macarons.  I had a black sesame flavoured one the other week that very much rocked my world!!!

Drooling over macarons!


The one thing that I have noticed in Hong Kong is their love for all things French... there is even a major French festival here!  Naturally with their love of frenchy stuff, there are plenty of stores filled with the beautiful coloured goodness of macarons.


Macaron store!


While window shopping in Hong Kong, I was enticed by the Laduree window.  It's sugary goodness, the pastel colours - they were totally calling me.  An entire counter full of beautifully coloured macarons awaited!!!


Macaron madness


We decided upon a box of 8... which was about $25AUD... not exactly cheap but we did have fantastic service and some free chocolate testing as well!  Also, the packaging and branding is absolutely beautiful... you are definitely buying into the brand.

Macaron madness


We selected...
  • Orange blossom
  • rose petal
  • salted caramel
  • pink pepper
  • liquorice
  • raspberry
  • the Marie Antoinette
  • chocolate, coconut and marshmallow
Totally decadent, totally delicious and totally worth it!!!


Sunday, January 26, 2014

Raspberry and Coconut Slice

Raspberry coconut slice


One of my favourite slices and sweet treats was Raspberry and Coconut slice.  I loved how the raspberry jam became like toffee along the baked edges and the crunchy coconut on top.  This is a slice that isn't particularly pretty but man it tastes good!!!

Ingredients:
2 cups of plain flour
1 cup of caster sugar
125 g cold butter cubed
3 eggs
1 tablespoon of vanilla extract
3/4 cup raspberry jam (I used a raspberry and pomegranate one)
2 cups of shredded coconut


  1. Preheat oven to 180 degrees celsius.  Grease and line lamington pan (24 x 29 cm).
  2. Process flour, 1/2 cup sugar and butter in food processor.  It should look like bread crumbs.  Add 1 egg and the vanilla and process to form a dough.
  3. Press dough into the base of the pan and bake for about 15 minutes or until a light golden brown.
  4. Remove from oven and spread the jam over the warm base.
  5. Whisk 2 eggs and 1/2 cup of sugar together.  It should become lighter and sugar should dissolve a bit.  Stir in coconut.  Spread this mixture over the jam.
  6. Bake for a further 25 minutes.  Remove and allow to cool in the pan before cutting and serving.
Raspberry and coconut slice

Enjoy the crunchy and sweet goodness!

Monday, January 20, 2014

Protein Ball Snacks

Food stuff


I've been reading about everyone and their 'protein' snacks and thought that I would give them a go.  I also wanted to find some delicious and easy snacks to take to work for both my husband and myself.  The recipe that I decided to use as a base was from Damy health, who always has pretty delicious recipes.

So here are my first attempt at Protein Balls!

Ingredients:
1/2 cup pitted dates
1/2 cup of pecan nuts
1/3 cup of shredded coconut
1/3 cup of almond butter (like peanut butter but made from almonds only)
3 tablespoons of wheat germ
1 tablespoon of chia seeds
2 scoops of protein powder (mine was a chocolate flavour)

Place all ingredients into a food processor and blend until the mixture comes together.  You may need to add a bit of cold water to help it along if your dates are a little dry.  Once the mixture is chopped and into a consistency that is a little like cookie dough, you can roll the mixture into smallish balls and place in an air tight container in the fridge.  This recipe makes about 12 balls for me.  You can also roll them in chopped nuts or coconut for extra crunch too!

They taste pretty delicious!  Just remember not to eat too many at once!

Tuesday, December 10, 2013

A Croissant in a Jaffle?

Yep, day old croissant with jam in the Jaffle maker? Genius!!!!


As many of you are aware, I'm a little bit obsessed with my Breville Jaffle Maker.  I adore it!  I'm a big fan of a breakfast jaffle, usually consisting of bacon and eggs or some other type of savoury filling.

The other day, we had some croissants that were starting to get a little old and dry.  They weren't looking too appealing.  I thought, "I wonder if it could be revived in the Jaffle maker?" The answer is YES!!

I sliced the croissant in half, added a little butter and some raspberry jam and them popped in the Jaffle Maker.  The result is a buttery, crispy and sweet pastry.  Added with some vanilla cream and you've got yourself a sweet breakfast treat.

Really, is there anything that you can't put in the Jaffle Maker?!!

Sunday, December 8, 2013

Homemade Celery Salt...

Homemade celery salt


We have been inundated with celery in our veggie patch and we have been trying to find new ways to use ALL of the celery.  My wonderful husband made this batch of celery salt, which I thought I would share with you all.  It is super easy and uses the leaves of the celery.

How to:

  1. trim leaves from celery
  2. wash well and spin in a salad spinner, you need to get them super dry.
  3. Pat dry with paper towel.
  4. lay on a tray, lined with baking paper in a single layer.  You don't want them over lapping otherwise they won't cook.
  5. bake in a low over (about 150 to 170 degrees Celsius) for about 3 to 5 minutes.  You want it dried out, not brown!
  6. you will need to do a few batches.  Add the dried out celery leaves to equal amount of flaky sea salt.  Store in an air proof container.
How easy is that?!  So what can you do with this delicious salt now?  Well you can add to your food as per usual, add to savoury items when you add salt or try it on boiled eggs like I did!


Boiled eggs with homemade celery salt


Give it a go!  It's a great way to use up those final last leaves on the celery and adds great flavour.  Yum!

Wednesday, October 23, 2013

Pomegranate Sour...

Just whipped up some Pomegranate Sours for a Saturday arvo... Recipe will be on my blog!


I've been a little obsessed with sours lately.  That frothy foam can transform a basic drink into something pretty special.  I also love pomegranates for the warmer months so I thought I would try my hand at a pomegranate sour!

Ingredients:
240 oz pomegranate juice (such as POM)
180 oz of Belvedere vodka
60 oz of lemon juice
30 oz of simple syrup
30 oz of egg white (about the egg white of one egg)
ice

Like any sour, add all the ingredients with ice into a cocktail shaker.  Shake! Why do we shake?  Well we need to combine and froth the egg white and chill the liquid.

Pour into chilled martini glasses or a short glass.  This recipe makes 2 cocktails.

Enjoy!!

Thursday, October 10, 2013

Beetroot and Fennel relish...

Perfect partnership: homemade bread... Homemade relish... Now where's that cheese?! @paosinis


In the spirit of 'make do and mend' - I have been trying to waste less food.  The recipe for this Beetroot and Fennel relish is something that I just made up, mostly due to the ingredients needing to be cooked or they would have been in the compost bin very soon!

I adore beetroot relish as an accompaniment with cheese.  I think that I got hooked on this combo after having a cheese platter at Domaine Chandon in the Yarra Valley many years ago but nothing beats/beets (get it, beets!?!) making it yourself.

Ingredients:
2 large beetroots
2 small to medium fennel bulbs
2 small brown onions
approximately 2 cups of cider vinegar
1 cup of caster sugar
about 1/3 cup mustard seeds

How to...

Clean beetroot bulbs and fennel.  Chop fennel into large chunks, chop beetroot into eights.

Making some beetroot and fennel relish!

    Lightly drizzle olive oil on beets and fennel and roast in a hot oven for about 35 minutes (or until beets are slightly soft) Keep an eye on the fennel to make sure that it doesn't burn!
    Remove from oven and cool.
Fennel and beetroot roasted and chopped ready to be made into relish!

Place beets and fennel in a food processor and blitz until it is in small pieces.  Do not turn into a paste!

Chop onions and lightly sweat until transparent in a large pot. Add the beet and fennel mixture and slightly cook together for a minute or two. Add sugar, mustard seeds and vinegar and bring to the boil. Turn heat down and simmer for 40 minutes, keep and eye on the mixture to make sure it doesn't dry out too much or is sticking to the bottom of the pot.

Mixture should be glossy, a little saucy but not too runny!  Spoon into sterilized jars and seal.  Relish should last about 2 to 3 weeks in the refrigerator if not sealed in a jar, it will last longer if properly sealed.


Drool... Bread, relish and aged Gouda...

Enjoy your relish with some delicious cheese and bread!

Monday, September 16, 2013

A fancy egg-ie bread...

Eggie breakfast goodness!


I love eggs for breakfast.  I go through stages of how I like them; boiled, scramble etc.  This week I've been making the good old 'Eggie bread' in the morning as it is quick and definitely satisfying!

This fancier version adds a good amount of flat leaf parsley while cooking.  I love how the parsley gets a little crisp.  Our parsley is going a little crazy at the moment, I feel like I'm using it in almost every meal!

You've never made 'eggie bread'?!  Simply you cut a hole in the bread (discard this part).  Heat a little oil in a frying pan, place bread in and then crack an egg into the hole and cook to your liking.  It only takes a few minutes and is delicious!

I like to cook mine so the egg yolk is still runny when I cut into it.  How about you?  How do you like your eggs?

Sunday, September 15, 2013

Recipe Remix: Granola topped Carrot Cakes

Carrot & granola cakes out!
Granola topped Carrot Cake


I thought for this recipe remix that I would combine two of my loves; carrot cake and granola!  It also turned out that I had some granola that I made during the week left over so it worked out perfectly.  These little cakes are moist, crunchy on top and super delicious!

The original carrot cake recipe can be found here.  However for this recipe, I swapped the olive oil for macadamia oil.  It has given it a lovely nutty flavour and I would highly recommend it.  Just to recap, here are the ingredients that you will need!


Ingredients for carrot cake:
3 good sized carrots grated (you want about a cup of carrot)
1/2 cup of olive oil - I used macadamia oil
3/4 cup of light brown sugar
1 cup of self raising flour
1/4 cup of chopped walnuts (you can add extra if you like the crunch!)
2 eggs
1/2 teaspoon of allspice or to taste


*************

Mix the sugar, eggs and oil together (I did this on a low setting in the kitchenaid mixer)
Add carrot and flour and mix again.
Stir through walnuts.
Add mixture to 12 muffin tin, that has been prepared with paper cases.
Sprinkle granola on top.
Cook at about 170-180 degrees celsius for approx 20 minutes.


Granola topped carrot cakes
Here they are just before going in the oven!


For the granola recipe, you can find one of my basic granola recipes here.  If you are anything like me, you generally make granola each week and have it on hand!  You could also use a bought granola too. These didn't last long in our house!  They are moist and not too sweet - they definitely hit the spot if you are craving cake.

Enjoy!!!

You may also find this delicious!

Related Posts Plugin for WordPress, Blogger...